


 --> Editing Personality
EDITING A PET'S PERSONALITY VALUES
A pet's behaviour is controlled by two things: its species, such as Cat or Dog, and its individual personality values, such as Liveliness, Confidence, Insanity, et cetera. These values are separate from a pet's genes, changing the personality values themselves will not affect how a pet's offspring will behave - and at the same time, changing a pet's genes does not affect how it itself will behave.
Changing a pet's personality values is a fairly straightforward procedure, it is a good introduction to HEX for beginners. Do not worry if you have not opened a hex editor before, I will explain each step in - hopefully - easy to understand terms. If you are lost at any point, or do not understand the language used, refer to the terminology page.
Things you will need for this tutorial:
- LNZ Pro (found here) - This allows easy editing of a pet's LNZ section, primarily used by hexers. It is somewhat limited outside of hexing, but useful regardless.
- a hex editor - This is needed for editing the entire pet file, LNZ Pro on its own can't access the sections needed for this tutorial. If you do not have a hex editor, googling 'free hex editor' is a good way to get one, I personally use HxD.
- GoalDescriptor Analyzer (found here) - This is a program that finds and lists a pet's personality values, though it can't edit them. Technically optional, but very helpful!
Index
Step 0 - Setup
- Choosing a Test Subject
- Preparing your Pet for Editing
- Looking Around the Pet File
Step 1 - Editing HEX
Step 2 - Balancing the Checksum
End of Procedure
Step 0: Setup
First, we will choose our test subject, prepare it for editing, and look at the layout of its file.
Choosing a Test Subject
Decide which pet you want to modify. For this tutorial, I will use Needy, a Russian Blue cat, as our test subject.

As her name suggests, she cries for attention almost constantly.
Next, we will see what values we are working with. Open GoalDescriptor Analyser, then select your pet's file. You should now see a list like so:
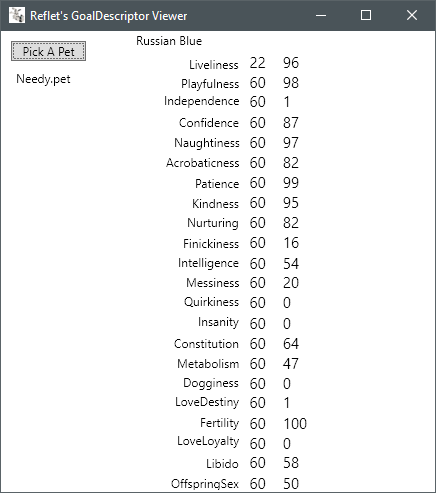
Depending on what version of Petz you use, these values may look a little different. Note that GoalDescriptor won't work on pregnant petz, as all the personality data is shifted down.
The first values are for Petz 4 petz, the second values are for Petz 5 petz. Our example pet is from Petz 5, so the first values are just garbage data.
Here we can see the cause of Needy's neediness, her Independence personality value is a pathetic 1. We will be setting this value to 50, to encourage her to be self-sufficient whilst also seeking occasional affection.
For (incomplete) information on what each personality value does, see this RKC thread.
Preparing your Pet for Editing
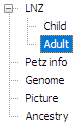
Open your pet's file with LNZ Pro.
Navigate to the section called Adult and open it, this is the Adult LNZ - where we will be editing.
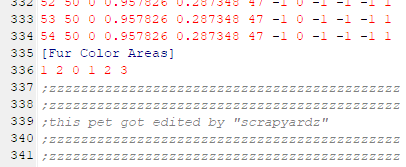
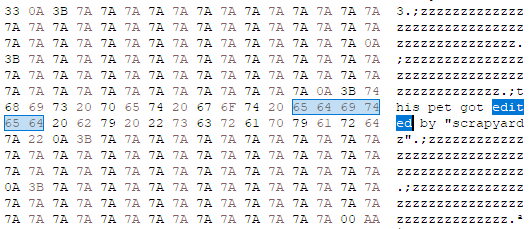
Scroll to the very bottom of the file, and copy+paste the following block of z's on the last line:
;zzzzzzzzzzzzzzzzzzzzzzzzzzzzzzzzzzzzzzzzzzzz
;zzzzzzzzzzzzzzzzzzzzzzzzzzzzzzzzzzzzzzzzzzzz
;this pet got edited by "enter your name here"
;zzzzzzzzzzzzzzzzzzzzzzzzzzzzzzzzzzzzzzzzzzzz
;zzzzzzzzzzzzzzzzzzzzzzzzzzzzzzzzzzzzzzzzzzzz
(This z-method was taken from Reloaded's personality tutorial, whose website seems to be down.)
Once the z's are added like so, save the file.
The pet's file is now prepped for editing.
Looking Around the Pet File
Ensure you now save a backup of the file somewhere safe, it only takes a small mistake to accidentally corrupt a pet during editing.
Open your hex editor, and open your chosen pet's file inside it. We will not edit anything just yet, but we will go over the sections we will be using in this tutorial.
You should be greeted with this, with some differences depending on your hex editor:
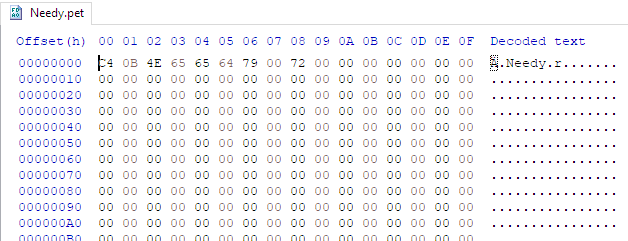
Let's go through what we are looking at here.
- On the far left we have the Offset, which is how many bytes down the file you are, it is basically the line number.
- The block of numbers in the middle are the Hex-values. These HEX numbers are what we will be editing later.
- The full stops and letters on the far right is the Decoded text, or the Text-string. This is the hex editor's attempt to translate the HEX numbers, we will be searching for specific words here.
There are a few sections coming up we need to know how to find. First, press ctrl+F to bring up the search menu. Search the Decoded text for 'edited', without quotes. This will find the zzz section we added during prep, if you changed the text in the middle just search for whatever you replaced it with.
Start scrolling down. The zzz section is within the LNZ section, which we will be ignoring for now. Eventually, the LNZ section will end, and we will see a very large wall of 00s.
This is called the Blank Zone, it is used for checksum balancing. We will be coming back to it later.
Now bring up the search menu again with ctrl+F. Search the Decoded text for 'YALP', without quotes.
If you cannot find YALP (likely if your test subject is Gen2) simply scroll down to about offset 5800 HEX until you can see the pictured section.
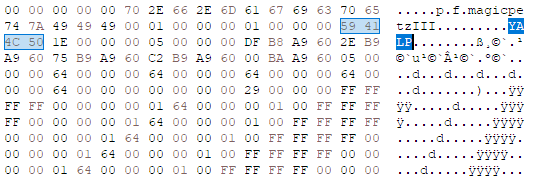
This is the YALP section. Above the YALP we have one of many 'p f magic's, however we need to find the p f magic below YALP for personality editing.
Underneath the YALP section we can see a diagonal line of ÿ's, this is called a y-band and is used for gene editing.
Open the search menu again and search for 'magic', without quotes. Press 'ok' instead of 'search all', and make sure your search direction is set to 'forward'. We only want the p f magic immediately after the YALP section.
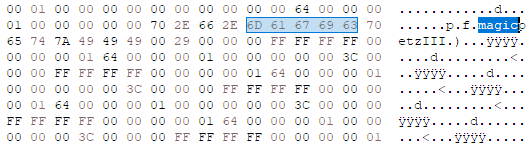
This is the post-YALP p f magic. You can tell it is the correct one as it has small dashes of ÿ's underneath it, and is around offset 62B0 HEX for non-pregnant petz.
Setup is now complete, now we can actually start editing.
Step 1: Editing HEX
First, highlight the first 'p' of the post-YALP p f magic we just located.

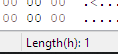
This may differ depending on your hex editor, but if you look near the bottom of the screen, you should see a value labled 'length'. This is how many bytes you are currently highlighting, currently 1 as we are only highlighting the 'p'.
Double click the length value to change it.
To find what length is needed to find your chosen personality value, refer to the Genome and find the respective value under Personality Values.
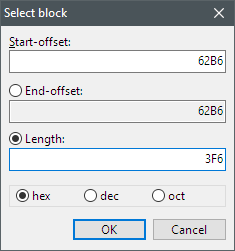
I will be changing Needy's Independence value, which is 3F6 HEX from the anchor. Ensure you are entering the value in HEX and click 'ok'.
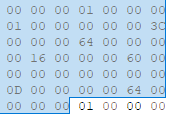
A large amount of bytes should now be highlighted. Your chosen personality value is the byte immediately after the highlighting ends. Here, we can see it is 01 HEX, which matches up with Needy's Independece 1.
If the numbers don't seem to match, that is because one is in HEX. You can convert decimal (normal numbers) to HEX here.
Before we edit this value, open Notepad, or get a scrap of paper and a pen. We need to note down what the number is orignally before we change it, and what value we want to change it to. You will need this information for balancing the checksum.
After you have written down the orignal value, highlight the personality byte and change it to your desired value in HEX.

I want to set Needy's Independence to 50, which is 32 in HEX. Numbers are helpfully highlighted in red once you edit them.
Now we have changed a value, we need to balance the file's checksum, or the pet will corrupt upon opening the game.
Step 2: Balancing the Checksum
A checksum is Petz' defence mechanism against file tampering. It checks the sum of every byte in a pet's file, and if it notices the total is any bigger or smaller than usual it corrupts the pet.
To avoid corruption, we must balance out any changes we made to the file. If we removed bytes from an area, we will add them back in somewhere else. If we added bytes, we will remove some.
The method for balancing is slightly different depending on whether you edited a value to be higher or lower than it started, so we will go through them both.
Higher
This section is for if you changed a value to be higher than it started. For example: changing 00 HEX to 64 HEX, or 2A HEX to 49 HEX, et cetera.
We have added bytes into the file, so we must take them away somewhere else. To do that, we will return to the zzz section.
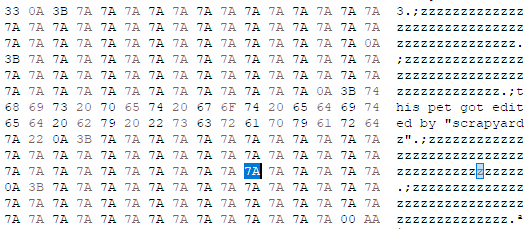
As we can see here, each z is 7A in HEX. We want to reduce one of these z's by the amount of bytes we added to the file.
First, we will work out how many bytes we added during our edit. To do this, we just subtract the orignal value (the OG value) from the value we changed it to (the New value). [i.e: New value - OG value = bytes increased]
In our example, the personality value I changed was orignally 01 HEX, and I changed it to 32 HEX. 32 HEX - 01 HEX = 31 HEX, so we have added 31 HEX to the file overall.
Keep in mind, HEX numbers don't always add/subtract like normal decimal numbers. It is helpful to have a HEX calculator on hand.
We will now subtract this amount from a single z (7A HEX). In this example, 7A HEX - 31 HEX = 49 HEX, so I will change one 7A HEX to 49 HEX, thus removing the 31 HEX we added before.
Our edit is now balanced, you may now save the file.
Lower
This section is for if you changed a value to be lower than it started. For example: changing 64 HEX to 00 HEX, or 3B HEX to 3A HEX, et cetera.
We have removed bytes from the file, so we must add them back somewhere else. To do that, we will return to the Blank Zone.
We will set one of these 00s to however many bytes we removed during editing. To work this out, we will subtract the New value from the OG value. [i.e: OG value - New value = bytes decreased]
Let's say a value was orignally 46 HEX and I changed it to be 2C HEX. 46 HEX - 2C HEX = 1A HEX, so we would have removed 1A HEX from the file.
Then you would just change one of the 00s to be the calculated value, so I would set it to 1A HEX in our example, adding back the 1A HEX we removed during editing. It doesn't matter which 00 in the Blank Zone you change, some bytes store what clothez a pet is wearing but I haven't found an issue with them yet.
Our edit is now balanced, you may now save the file.
Easier Way to Balance Checksums
Yes, you have been fooled into learning. There is a much quicker way to balance checksums now that Reflet has a tool for it, which recalculates a pet's checksum for you! For information on how to get it working, see the section on big edits in Balancing a Checksum.
End of Procedure
We have now successfully altered our subject's personality values. Ensure everything is saved, and close your editor.
You can check your pet's personality values in GoalDescriptor if you want to be sure they changed.

Here, we can see Needy's Independence is now 50, as intended.
Let's see how she's handling her new independence.

She is now content to completely ignore me, and busied herself with hunting mice instead. The operation was perhaps too successful.
And that's it! Good job making it to the end!
If you made a mistake during this procedure, or skipped the checksum balancing step as we all did the first time, and your pet has corrupted - do not fret. Simply load your backup file (which I am sure we all made) and try again.